

Wiki InstructionsBy popular demand! This article details the step-by-step instructions for submitting an article to the wiki. Print it out or save a tree by keeping this page open while you work on your article in another browser. We think you'll find that, after going through this once, you'll get the hang of it and be posting like a champ in no time! Before getting started, remember that this wiki is not only a place to showcase the technical know-how and experience of the 2GNT community as a whole, but also a place where you can build your own reputation for knowing your DSM inside and out. You should ALWAYS give yourself credit on ANY article you submit to the wiki by linking to your screen name. There are locations to be found under the Community section where you can create your own profile page and showcase your projects and all that good stuff. Be sure to also link your profile page to the articles you submit so people who find your profile can see what else you've contributed to the DSM community! Step 1Log into the wiki using your Team 2GNT forum credentials. You don't need a new screen name or password to get into the wiki. Use the logon box in the menu on the left.  Step 2[b]Once you are logged into the wiki, navigate to where you think would be the best place for your article. We've set up a relatively simple structure to get you started. If your article is about a DSM, start under Cars. If your article is about this site, its members (that includes you), or your local DSM group, start under Community.[/b]  Step 3[b]Now that you've made your way deep into the wiki and found the best place to publish your article, you need to know how create a new page on which to put it. When you are on the page that you feel should have the link to your article, look to the top of the menu bar on the left and find -Change Content- When you click this, it will allow you to edit the page you're currently viewing. Note: Some pages have been locked by the Site Team in order to maintain the structural integrity of the site. These pages won't have a change content link. If you feel that an article really needs to be linked from a locked page, contact a member of the Site Team and share your concern. In edit mode, the screen will look something like this:[/b] 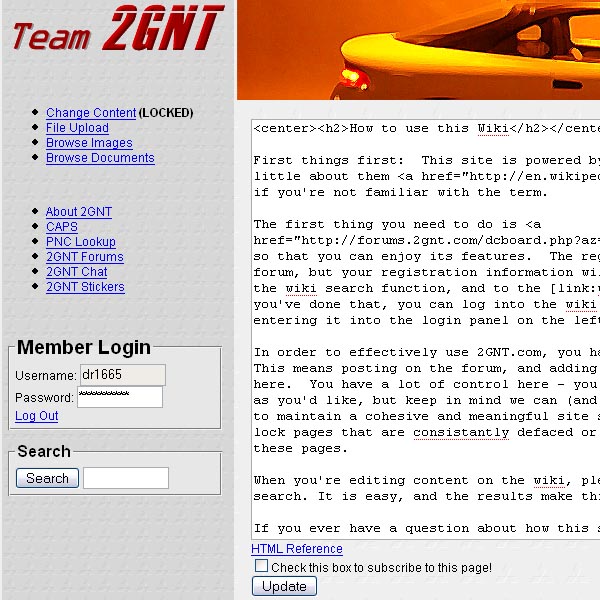 Step 4Add a link to your article on the page. Find the spot on the page where your link will not look out of place. If there is some kind of order to the page, try to follow that order as best you can so things look their best. Any term enclosed in double square brackets will become a link. The usual HTML tags will work as well. (More info on tags later.) If you are in doubt as to how to make part of your article look like something you've seen elsewhere in the wiki, visit that site and consult/copy the code you need that way. The link you clicked to read this article is made up of the code in red below.  Step 5When you have your link and a short description where you want it, click the submit button at the bottom of the page. This will publish the new version of the page, complete with your link. Click your link to visit the future home of your article on 2GNT.com!  Step 6Click the -Add Content- link in the menu to view the page in edit mode. If your article is already typed up in Word, you can simply copy and paste into this window, but keep in mind that you're encouraged to make your article as sharp and professional as possible through the use of HTML tags which make text bold, italic, etcetera.  Using HTML tags to make the title look a certain way... 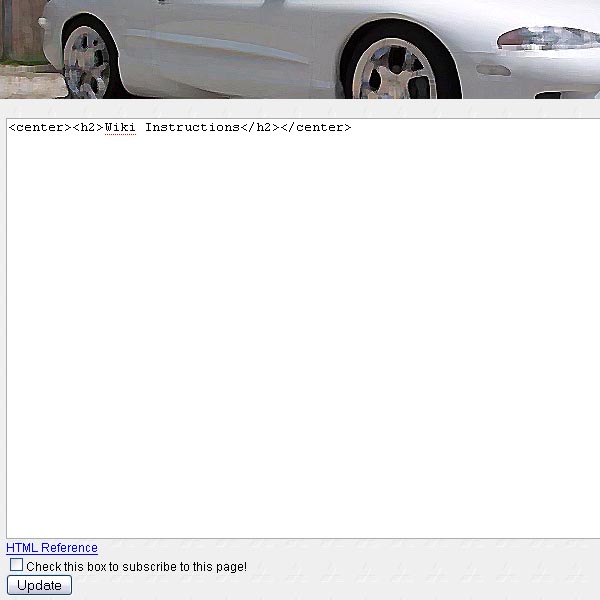 This article in it's early stages... 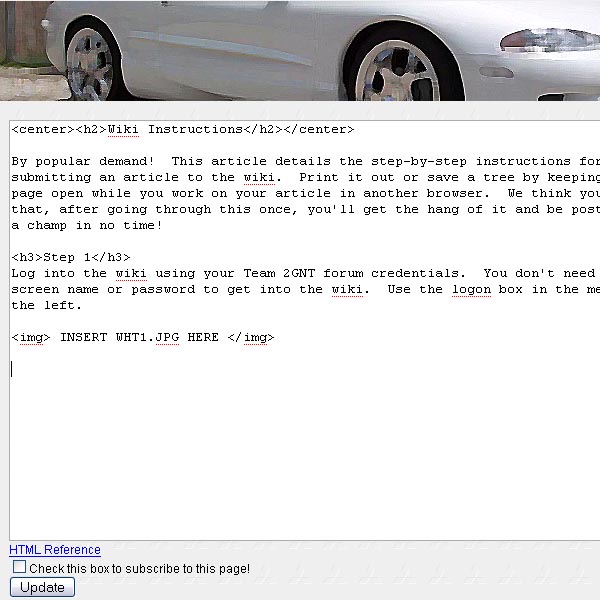 Step 7As anyone who has ever looked for a good write-up will tell you, a picture is worth a thousand words. If you've got pictures to go with your article, click the -File Upload- link in the menu and upload the file. Details about which sorts of formats are accepted are listed on the uploader page. If you should experience problems with the uploader not taking a file with the right extension, please hang onto the file and post in the discussion thread on the forum. When your image is successfully uploaded to the server, the upload page will reload and provide you with both a link to your image and a line of code to conveniently post the image into any wiki article. You might want to open Notepad on your computer and paste these links there before beginning your article if you have a lot of images. This will allow you to copy them all at once from Notepad and paste them all into your article at once. It's nice to be able to use the pictures to help write the article. 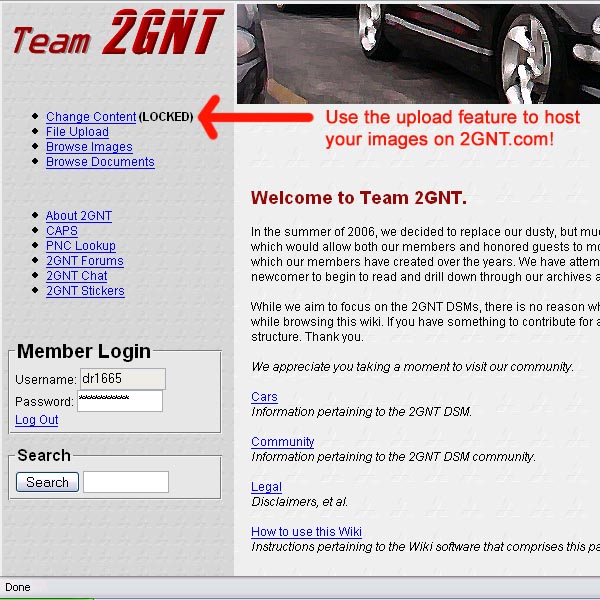 Step 8[b]When you have finished your article, or if you'd just like to see how it's coming along, click the submit button and your page will load as-is. You can go back in and change the content as many times as you like, so don't worry about previewing things too many times. If you are unable to finish the article before you have to leave your computer, you can even put a -To Be Continued- comment to let others know you're not finished yet, and then come back when you have more time. It's just that easy. Step 9Be courteous to your fellow DSMers by including a link back to the page they came from. At first, this might seem a bit tricky, but it's not so bad. Remember how you make a link by putting a term inside double square brackets? Well, go back TWO pages and look at the link you clicked. Odds are really good that the link text is all you need to put inside a set of double square brackets at the bottom of your page to link someone back to the page they were just on. Since non-Site Team members can't edit the pages prior to this one, here is the code showing the link used. The same text will be used at the bottom of this article to link back to the How-To page.  HTML TagsHere is a guide to some of the more commonly used tags in our articles.  This is h1 This is h2 This is h3   This is bold  This is italic A couple things to keep in mind...There is more that can be done in the wiki with tables, charts and the like, but this information should suffice for the vast majority of people. In the future, more detail may be added to this article as needed, but this is enough for today. Thanks for reading and have fun posting in the wiki! How_To_Use_This_Wiki |
| Document statistics: Last modified on 2012-09-13 09:41:47 by DarkOne |