
Full Talon to Eclipse ConversionBy Chris Manzione Chris712VT The following is my personal writeup on how to do the front and rear conversion from a Talon to an Eclipse: When converting different front and rear ends on 2g DSMs, the front ends are all direct swaps. The rear ends, however, require some fabrication and rewiring when going from Talon to Eclipse parts. So I wrote this article to help others who are attempting this conversion. I also submitted it to the tech sections of DSMtuners and 2GNT. It is a step-by-step guide to converting the rear end of your 2g Talon to a 2g Eclipse. I have written this how-to guide based on my own experience and pictures I took along the way. So without further ado, let's get started. MATERIALS:- Eclipse rear bumper and tail lights! - 2 small sections of angle iron about 6-8 inches long, or 4 L-brackets. - 8 bolts, M8x1.25x25 is what I used but it doesn't matter if you use a different size. - 8 matching nuts. (Optional depending on method used, see tools list below) - 10 sections of wire 16-18 gauge about 12 inches in length. - 16 butt connectors. - 6 male and 6 female spade connectors. - Electrical tape. TOOLS:- Basic phillips and flathead screwdrivers. - 10mm socket/ratchet. I found it helpful to have my small 1/4 inch ratchet with deep 10mm socket for the tail light nuts and regular 3/8 inch ratchet with standard and deep 10mm sockets for the bumper bolts. - Wire strippers/crimpers. - Scissors or wire snips. - Welder for tacking nuts. JB Weld will work too. Or you can tap your angle iron or L-brackets if they're thick enough so your bolts thread right into them, therefore eliminating the need for the 8 nuts. - Power drill and 3/8 inch drill bit. - Spray paint to coat bare metal. I used flat-black Rustoleum high performance enamel. STEP 1: Remove Interior Panels in Hatch AreaThis should be easy enough. The center panel was a bit of a pain to get off, but it was only held on by several metal and plastic clips that snap out. Pop the top off by pulling it upward, then you should be able to see inside to see where else it is held on. Some are snapped in vertically, some are snapped horizontally, and some you just slide off side to side. Once the center panel is off, work on the side panels. Unscrew the black plastic hooks on the two removable sections behind the tail lights, slide their tabs in, and remove those. Unscrew the screws along the bottom of the panels, above the strut towers, and the two that had been behind the center panel. You can take these side panels all the way out, which will make things easier, or just get everything loose enough to get an arm in behind them to get at some bolts later. STEP 2: Remove Tail Lights and Center SectionUnplug the wiring harnesses that plug into the tail lights. Remember there are the main white ones in the center of each as well as the black ones in the outside corners. There are 4 harnesses to unplug in total. Now remove the nuts holding the tail lights bolted in place. There are 7 for each tail light, 7 for the center section, and they are all 10mm. STEP 3: Remove Rear BumperThe hardest part of this step is removing the splash guards behind the rear wheels. They each are secured to the car via 2 bolts, then to the bumper by 5 bolts or snaps if my memory is correct. Once you finally get these bad boys out of the way the bumper is easy. There is one bolt going through the bumper from below at each corner. Once the splash guards are out you should see them in there. Next, look under the bumper in the very center. On my Talon, there were 2 bolts securing the bottom of the bumper here. Now move to the hatch area. These next 4 are a pain, or at least they were for me because I didn't fully remove the side panels. On each side there are 2 bolts you need to locate. One will be going down through the car and into the bumper near the corner of where the tail light used to be. The other will be in the same area but goes horizontally through the car and into the bumper below where the corners of the tail lights were. Finally, the hard ones are done! Now just unbolt the 3 bolts that were under each tail light and the 4 that were under the center section. Remember to unplug both license plate light harnesses, then you can take that Talon bumper off and get ready for the fun part. STEP 4: Extend Reverse Light WiresTake all the bulbs, wires, and harnesses out of the Talon tail lights. Take the reverse bulbs from each, they're the ones with a black wire and a red/blue stripe wire. Cut those wires close to the bulb socket so you have plenty of wire to work with, and strip off the tips. Grab 4 sections of wire and connect one to each of your freshly cut and stripped wires via butt connectors. On the other ends of the new wires, connect 4 male spade connectors. See the diagrams in step 11 for a visual. Take the reverse lights you will be using in your new Eclipse bumper. Leave the bulbs in the lights, leave the harnesses connected to the bulb sockets, and cut the black and red/blue stripe wires. Connect 4 more sections of wire to these freshly cut and stripped wires via butt connectors. On the other ends of these sections of wires, connect 4 female spade connectors. So you have an extra 12+ inches of power and ground wire coming off the Talon tail light harnesses, and you have an extra 12+ inches of power and ground wire coming off the reverse bulbs. This should be plenty of distance to reach the new reverse light location, and the spade connectors make for an easy way to disconnect the wires in the future if needed. Tape up all your connections, and later on when you go to install the rear bumper, you can run these wires through the old Talon center section holes that are no longer used. You'll see what I mean in green on a diagram shown in step 5. STEP 5: Drill Holes for Center Section of Eclipse Tail LightsTake a look at the back of the car now that the bumper and lights are out of the way. The factory made it easy for you. There are three flat circular spots directly above the bottom three bolt holes of the old Talon center section. You're going to drill a hole in the center of these three spots just large enough to fit the new center section's bolts through. See the diagram below. I show in red the 3 holes I'm talking about. Don't get ahead of yourself though, just do those three. Now bolt on the Eclipse center section through the new holes. Try to put the new tail lights in as well to check fitment. This may not be necessary, but when I got to this step my tail lights did not want to fit correctly and had bad gaps. I realized I needed to drill out some of the tail light bolt holes as well. See how some of the tail light bolt holes are literally holes, but others are slots? I needed to open up those slots a little, I think 3 of the 7 on each side were slots that needed to be drilled wider. After I did this everything fit beautifully, but check your own fitment first before you do the extra drilling as you may not need to. 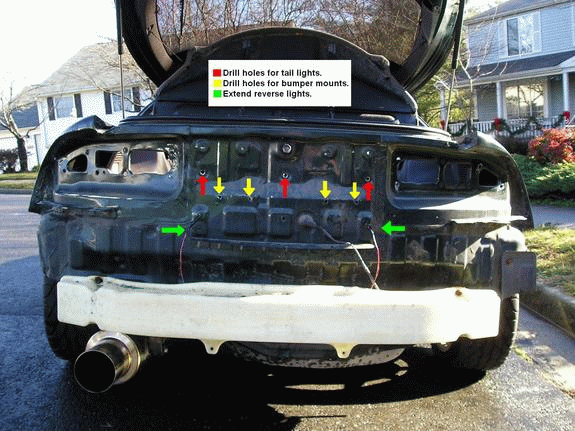 STEP 6: Drill Holes in Angle Iron or L-BracketsYou�re probably wondering... These Eclipse lights are way skinnier than those Talon lights. And those bumper mount brackets are too low now for the new bumper. Well, you get to make new ones! At least new center mounts, the smaller ones under each tail light aren't necessary... unless you really want to make new ones there too. Take the angle iron or L-brackets you will use as the new center bumper mounts. Obviously, if you're using the angle iron as I did you'll be making 2 holes in each, only one hole per L-bracket if you choose this route. Make some holes! These are the holes where the new bumper mounts will bolt to the car so their placement is not a crucial issue. STEP 7: Drill Corresponding Holes in CarThis is critical to the outcome of your conversion - measure several times. How much of a gap do you want between your tail lights and bumper? 1/8 inch? It's up to you. But be very careful here. Find exactly what the distance is between the top of the bumper and the bottom its "mounting lip" for lack of a better name. The best way to do this is probably to set a level on top of the bumper, sticking out far enough to measure vertically from the bottom of the level (top of the bumper) to the bottom (under side) of the lip where you bolt the bumper to the car. Make sure you are correct on that measurement. Now add whatever gap you want, 1/8 inch or whatever, to your measurement. With the center section of the tail light still bolted on for reference, hold your angle iron or L-bracket so that the top of it is exactly the same distance from the bottom of the center section as your measurement. With the angle iron or L-bracket at the correct distance below the tail light center section, mark through the holes you previously drilled where you now need to drill into the car. Got it? You'll need a second set of hands to do all this. Now that you have marked on the car where you need to drill the 4 mounting bracket holes, double check everything. If you're correct and confident everything will bolt together with the correct gap, proceed. Drill those holes, which are marked in yellow on the diagram above in step 5. Now temporarily bolt the angle iron or L-brackets to the car through these holes you've drilled using 4 of the nuts and bolts. Set the bumper on your new brackets. Does it have the gap you expected? Is it level? I hope so! STEP 8: Drill Second Set of Holes in Angle Iron or L-BracketsWith the bumper hanging loose on the new mounting brackets, make sure the bumper is centered and pushed all the way in towards the car. Mark through the bumper bolt holes where you need to drill into the angle iron or L-brackets. This is no where near as involved as the holes you marked in step 6. Now drill the holes for the bumper side of your new custom mounts. You should be done drilling now. You made 3 holes in the car for the center section, and possibly widened a couple others for the tail lights as well. You made 4 holes for your new bumper mounts to bolt on with. And you made 8 holes in your brackets. That should be all. STEP 9: Weld Nuts or Tap BracketsThis was fun. You'll need to attach the nuts to the brackets, or thread the brackets themselves so you'll be able to bolt them to the car and the bumper to them later. Think about it, one way or the other you won't be able to reach those nuts when you're doing final assembly, so you should address that problem now. I tack welded the nuts on, but you can use JB Weld instead. Or you can tap the 8 holes you drilled in your brackets if they're thick enough. Assuming you're welding the nuts on, do as I did. First of all make sure you're attaching the nuts on the insides of the angle iron or L-brackets, the outsides will be bolted tight to the car and bumper. Second, make sure your nuts are positioned correctly. I apologize I didn't take a picture during my welding process to show you how I had them set up, but I'll do my best to explain. I took the bolts and put them through the 8 holes in my brackets. I then screwed the nuts on and down until they were tight on the brackets. I also covered the rest of the bolts to make sure their threads would not be ruined by welding spatter. Then I got started tacking the nuts onto the inside of the brackets. I made 2 or 3 solid tacks on each. After they had cooled I removed the bolts and grinded as much of the spatter off the insides of the brackets as I could. This isn't necessary, you won't even see them, but I like my work to be clean so I did it. Then I painted my finished bumper brackets to avoid any rust problems on down the road. I also painted around the holes I drilled in the back of the car. Check out the pics below. 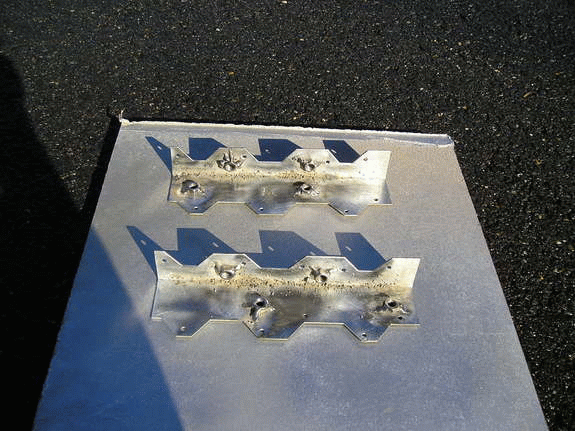 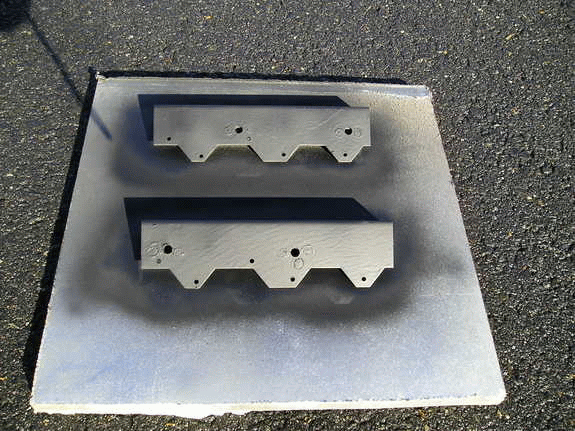  Step 10: Bolt on the New Brackets and BumperI was proud of my brackets, but it's time to cover them up. You need to take the tail lights and center section back out if you haven't already. Bolt your bumper mount brackets onto the car, make sure they're tight and level. Then put the bumper on top of them and bolt it down. Remember to run the extended reverse light wires through the car via the empty holes before you bolt the bumper in place. Don�t forget to plug your license plate wire harnesses back in either. Bolt those 4 bolts inside the hatch back in, the ones that were near the outside corners of the tail lights. Bolt the 2 underneath the car back in, and bolt the 2 corner bolts back in near the rear wheels. Put those splash guards back on. Done! Look at that beautiful new bumper. Just kidding about the done part, still have to wire the tail lights. STEP 11: Tail Light WiringFor this step, you�ll be combining your existing Talon wires and the wires that are in your new Eclipse tail lights. The end result will have all six bulbs come on as your parking/marker lights, the outside bulb on each tail light will flash bright as your blinker, and the two inside bulbs on each tail light will go bright for your brake lights. You should already have the Talon wires and bulbs out of the tail lights from step 4. Refer to the diagram below. It shows what your Talon wires look like. To start things off, pick up your first set of Talon wires. You should already have the reverse bulb sockets cut off and your new wire extensions connected. Now grab the blinker bulb socket. It�s the one with the black and green/blue stripe wires. Cut both wires close to the socket. You won�t need these any more so tape up the ends, fold them back over the bundle, and tape them down to get them out of the way. Now grab the last bulb socket, the brake light. It�s the one with black, solid green, and green/white stripe wires. Cut all three close to the socket as you did with the others so you have as much wire to work with as possible. Strip the tips of all three of these. Do all this to the other set of Talon wires as well. 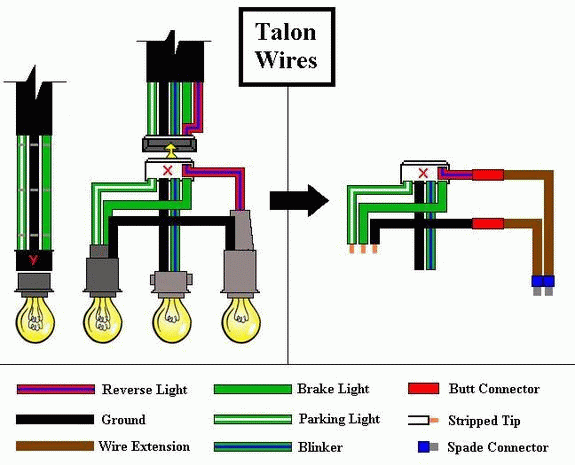 Now take all the wires and bulbs out of the Eclipse tail lights. They should be different in that they only have two bulbs running off the main harness, and they both have the same black, green, and green/white stripe wires. See the diagram of the Eclipse wires below. Pick up the first set of Eclipse wires, and cut all three wires coming out of the back of the harness. Make sure to cut close to the harness on these, opposite of where you cut the Talon wires. Strip the tips of these three wires. Do the same to the other set of Eclipse wires. 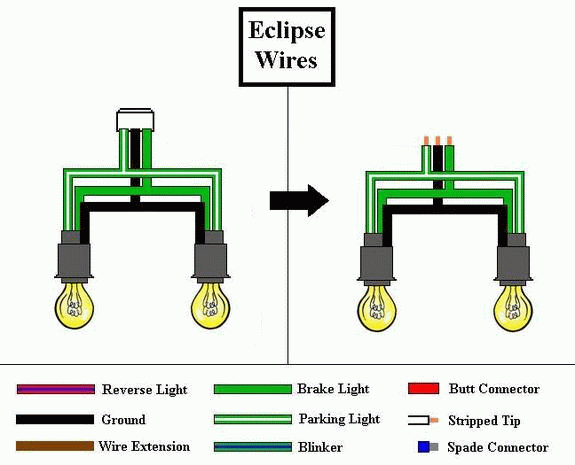 Can you guess what you do next? You should have two sets of Talon harnesses and wires, and two sets of Eclipse wires and bulbs. Take 6 butt connectors and start connecting black to black, solid green to solid green, and green/white stripe to green/white stripe. Your end product should now be two sets of wires, each having the Talon harness, the three wires that used to go to the brake bulb have now been split to two separate bulb sockets via the Eclipse wires, the two wires that used to go to the blinker bulb have been cut and taped into the bundle, and the two wires that used to go to the reverse lights have been cut and extended with male spade connectors on the ends. Are you with me? They should look like the picture below, this is one of my completed sets of wires. Well, not fully completed, you still need to tape up all those new connections. I took the pic prior to taping everything up so you could see the connections. 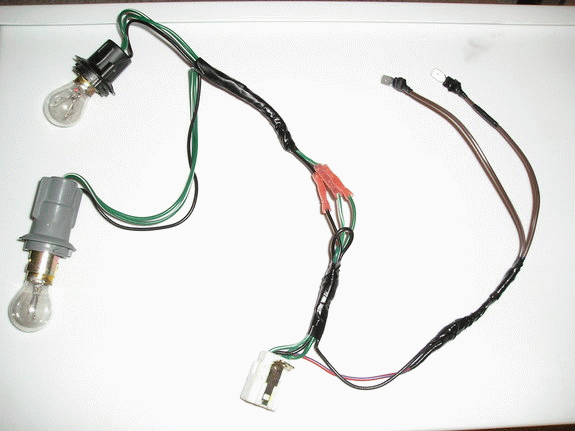 You�re in the final stretch! The rest of the rewiring occurs inside the hatch of the car, so put the wires you were working with before from inside the tail lights aside, they�re done. This final step will give you your blinkers in the corner bulbs. Take a look at my final wiring diagram below. I will be referring to the main white harnesses as harness X, and the corner black harnesses and harness Y. Also note that on the passenger side, the blinker wire is green/red stripe while everywhere else it is green/blue stripe. I will just refer to them as the blinker wires to avoid confusion. Take the X harnesses, cut only the blinker wire. Cut close to the harness so you have plenty of wire to work with. Strip the tips on the wire bundle side, and tape the tips on the harness side. Connect the final two sections of wire to these blinker wires with butt connectors, and tape them up. On the other end of the wire extensions, connect male spade connectors. Now take the Y harnesses, cut the solid green wire going to each. Cut as far away from the harness as you can so you have room to work with. Tape the sides going to the wire bundle, and strip the tip of the side going into the harness. Connect a female spade connector to each of them. Your wires should look like the diagram below. 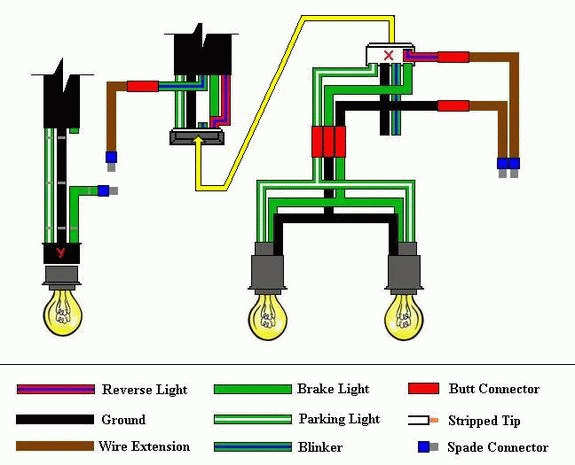 STEP 12: Install Tail LightsTime to put it all together. First bolt on the center section of your tail lights. Next put all your new wires and bulbs and sockets into the eclipse lights. Make sure all 6 of your bulbs are dual filament bulbs too, because they will all be serving two purposes. Bolt on your tail lights. Plug all your spade connectors together for the reverse wires and blinker wires, then tape them. If you don�t, they could come in contact with each other, or any ground, and short out. Plug in your X and Y harnesses. Test your new lights. All six come on when your headlights come on right? The outsides are blinkers, and the insides are brakes right? And the reverse lights and license plate lights come on? If not, check your connections and check for any power wires that have been grounded. That�s it! Looks good huh? Now put those interior panels back in and enjoy your new Eclipse rear end. Finished product and material pictures, click below:Talon_to_Eclipse_Conversion_Pics My member page, click below:Chris712VT Back to: Body_Conversions |
| Document statistics: Last modified on 2007-06-21 20:04:26 by chris712vt |
