| 5speed Transmission Removal Via The "Drop Down" Method
For those that wanted a write up on tranny removal; First off, All the usual disclaimers apply; I’m not responsible for your tranny falling down (or you getting hurt), this is the way I removed it, so don’t hold me liable for any problems you might run into blah, blah, etc, blah. Basically, I’m liable for none of your problems, lol.
There are a few different ways to pull the tranny (attached to the engine, up out of the engine bay. Up out of the engine bay by itself. Down to the ground, by itself etc.) I chose to drop the tranny down to the ground, by itself.
First put your emergency brake on with your tranny in neutral. You can chock the back wheels if you like. Then you will need to get your car up on good, safe jackstands;

Try to get them up kinda high. You need to get it high enough to be able to pull the tranny out from underneath, once it is on the ground.
Then remove the wheels and open the drain plug for the tranny and let her bleed out while you go up above. The drain plug is located on the bottom/side of the Differential housing. Here’s a pic;

There is a little rubber “pull†plug located on the other side of the differential (just a little higher than the drain plug). If you remove that, the fluid will drain out a lot quicker.
Now go into the engine bay and remove the intake (I think you know where that is, lol). Then remove the battery and tray (4 bolts to hold tray on);

After you remove the tray, there is a little arm that holds the tray on;

You can take that off if you wish, but I usually leave it on. It does get in the way a little later on in the removal, but I work around it.
Now remove shifter cables eyelets off the tranny. Here is a pic of them.;

They are located below the arm that holds the battery on. Just pull the cotter pins and take the washers off the top of the eyelets. You can then pull them off, or you can pull them off after the next step;
Removing the “horseshoe†clips for the shifter cables off the bracket on the tranny. These clips can be tough to get at (especially the one under the heater hoses). I have taken a couple of pics for their location. The first pic is the easiest to get. The one just under the battery tray arm;

I use a big screwdriver or channel locks to pull those off;

The other one is a lot harder to see. It is located basically under the heater hoses. In the next pic just follow the screwdriver down to the end. That is where the other horseshoe clip is (tough to see but it is there);

or

You do need to push back on the housing of the cable a bit to get it to align with the slot that it needs to come out of. Now you can either tie them off, out of the way, or just push them out of the way.
While you are there, you can pull the VSS plug off the sensor. It is located next to the rear roll stop mount (it is held on by a black clip). Just squash down on the ear of the clip and she will pull right up. Here is a pic of the plug:

While we’re doing electrical, you can go to the radiator side of the tranny (down by the nose and near to the entrance to your old air box) and remove the plug on the reverse gear sensor. Here’s a pic of that;

That’s pretty much all the electrical (short of the starter and you don’t disconnect any electrical there anyway) except for the ground strap (which will be done when you separate the tranny from the block) and there is also a wire manager that holds on the main wiring harness to the side of the tranny. You can just unwrap that. Or you can unbolt it from the tranny (sorry no pics).
While you are in the area of the harness, you may as well unbolt the clutch hard line from its management on the tranny. Just one nut and you can pull it off (or do it later when you do the slave cylinder. Here’s a pic of the where the nut is tightened on;

Now its time to go back under the car. Your tranny has had enough time to bleed out, so you can now put the drain plug back in. I highly recommend tightening it down now. I have seen too many people forget to tighten it (recently on a dyno, a buddy of mine forgot to tighten the engine oil plug back down. Was not a pretty site).
Now you can remove the front to back cross beam (don’t worry your engine will not fall. It has three more mounts holding it on).

You have a total of 6 bolts to pull out. Two in the front;

Two in the middle (holding the front roll stop on);

And two in the back:

Next would be the two brackets that help support the tranny to block connection. There is one in front (not the greatest pic);

Just unbolt the two bolts holding it on.
And there is another bracket located in back. I never got a pic on it though. But it is located on the backside of the engine right next to where the passenger side axle slips into the differential (It is held on by two bolts). One bolt goes to the tranny (down low and it covers part of the inspection plate) and the other bolt goes to the lower part of the engine block (that should get you there).
At this point, the clutch slave cylinder would be next in line;


If you look at the second pic, you can see the two bolts that hold it on. Just undo those bolts. You will not crack the hydraulic system or anything like that. After you pull off the slave cylinder, you should hang it up with wire or something (I use the standard coathangers, lol) Off to the side. Here’s a pic;

Now you can remove the clutch inspection cover. The only thing left holding it on is one bolt in the middle of the plate (many times this is long gone). Here is a pic of that bolt;

When you remove the cover you will have access to the flexplate. It looks like this;

Now that you have access to the flexplate bolts, might as well attack that. There are 4 bolts that hold the clutch onto the flex plate. To access these bolts, we removed the clutch cover inspection plate. Now we will need to turn the engine over (90 degrees at a time) to access each bolt. The way I do that is I go to the front of the engine (pulley side) and remove the little plastic cover that is in front of the crank bolt.

I then take a ratchet and socket and put it on the crank pulley. I not only use that to spin the engine over for access to the bolts, I use it to hold the crank in place while I loosen the flexplate bolts. Here’s a couple of “kinda†pics of the two being used (I think you’ll get the idea).


When you pull out the bolts, just leave the flex plate and clutch assembly alone. Don’t worry nothing is going to fall out or break.
Now would be a good time to do the axles. To save time in my write up, I’ll just link you up to another write up I did.
Changing_an_axle_2
In this case, you CAN do the “quickie†removal. Its basically the same as the install I linked to, except you don’t remove the big old axle nut at the wheels. You can just take the inner axle joints and put them off to the side while they are still attached to the hub. Here are a couple of pics of where I stuck mine;
First driver’s side;

Then passenger side:

I actually block up the hub (with wood) on the passenger side (take the pressure off where the axle is hitting the tranny). That way its not leaning against the diff when I remove the tranny and re-install it.
OK, lets pull the starter now and then we can attack the tranny mounts. Just two bolts hold the starter on (one high and one low). Here is a pic with the bolts pulled back:

I like to tie the starter off also. Again, I use the old standard coat hangers;

Ok, now the mounts. First we need to support the engine and tranny separately. When I support the engine I like to use a piece of wood and jack. I place the wood on the rolled edge of the small side of the oil pan. This has the strength to hold without bending the pan. There are many ways you can support the engine, this is just my method. Here’s a pic (don’t mind the rust, lol):

Then you need to support the tranny. Again I use wood to support it (with a jack obviously). Here is a pic of that BUT in this pic, I don’t have the support correct. It should be further in toward the center of the tranny. Unfortunately, in my trying to remember everything while I was doing this, I inadvertently flipped my jacks around. I usually use the bigger jack for the tranny and the smaller jack for the engine. With the set-up the way it is now, I can’t get the smaller jack in further. So its not optimal support, but it will work:

Now that the support is up, its time to disconnect the back roll stop mount. I say disconnect because I don’t take it off the car, I merely disconnect it from the tranny.
I’d love to show you a nice clear pic of the mount, but it is pretty awkward to get to. So here’s a pic:

You can see it is located where the VSS sensor is. There are three bolts that hold it on. They are not that fun to get to, but you can go ahead and remove those three bolts (you can actually see the three bolts in the pic. They basically surround the VSS sensor).
I have a bit of a set-up to get to the bolts. I use an 12†and 6†extension to go onto a deep socket to reach the bolts. Looks kinda like this:

I then loosen the bolt that goes through the mount on the chassis side. I just loosen it so I can maneuver it later on. I didn’t get a pic of this bolt (basically because it was too hard to get a pic). But I’m sure you can figure out where that is.
Now there are just two mounts holding the engine in the car. The front mount (on the passenger side) and the nose of the tranny mount (on the opposite side). So let’s take off the tranny side mount. Here is a pic of that:

You can see that there are three nuts holding it on. There is also a cross bolt going through the mount. Making sure that you still have support on the tranny, remove the three nuts and pull out the bolt. If you have support on the tranny, it won’t be that difficult to pull out the bolt. Except for that battery support. That will get in the way of pulling the bolt all the way out. I simply bend it up a little so I can access the bolt. Slightly hokey but I’ve yet to have a problem. Now just work the tranny and engine set-up lower (the engine jack will basically support the whole thing. But it is good to maintain the tranny support as you lower also) until you can work the mount out. Here’s another pic!

Just a note on this mount, some people take this off differently. They may unbolt it from the tranny on the plate, they may just pull the center bolt or they may do other things. Like I said previously, this is the way I like to do it.
Now you have 4 bolts to go to pull the tranny. Another note here, Leaving these four bolts is important. You stand a chance of cracking you bellhousing should you not have these four bolts left on while you do the other maneuvering. That’s why I specifically leave these four on. They leave a connection of two bolts high and two bolts low on the tranny to engine connection.
So that being said, check to make sure that your tranny is supported and your engine is supported (I like to be sure that the engine height is reset close to where it was before I did the tranny nose mount).
Now remove the 4 bolts. I like to do the two bottoms ones first. That generally allows me to see if my support is being held properly. It should not ‘V†out at the bottom as you loosen the two bolts. I have a pic of the two bottom bolts (kinda). Here is the bottom front (under the starter)

This next one is a pic of BELOW the location of the opposite lower bolt:

This is back by your passenger side inner cv. The bolt is just above this area (I never got the actual pic of it, lol).
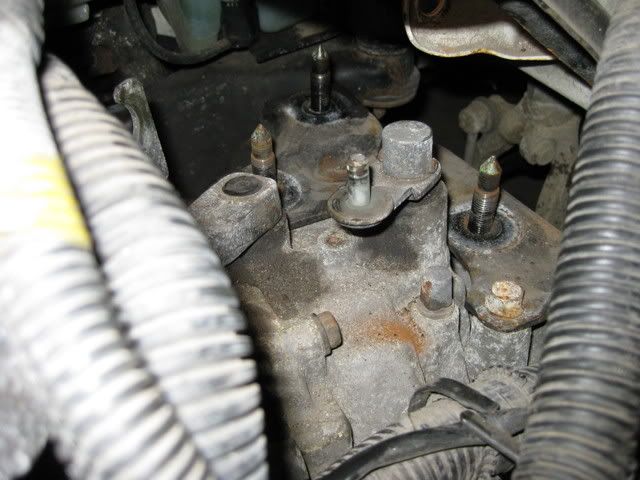
Now go up top to get the top two bolts. One is located on the front side, above the starter, just under the wiring harness;

The other is also under the wiring harness and above the bracket that the clutch cables seat into.

Here’s a pic of a ratchet on the bolt:

As you loosen these bolts, you should see a slight separation of the block and tranny. It should be a slight separation, not a big V. Here is what the separation should look like:

I normally just break them and back them off slightly to be sure that everything is “kosherâ€. Then I remove them totally.
Now the tranny should be able to start separating. I usually take a big screwdriver and just pry it out a little to get the disconnection started (a lot of times you can just wiggle it loose). Usually, you just need about ½ inch to work with and then you can start lowering the tranny (basically you want to get the tranny off of the lower dowel pins that the two lowest “block to tranny†bolts go through. Then start lowering the "nose"). I just start lowering the nose of the tranny slowly. Watch for it catching anything, or hanging up on anything.
I just allow the nose to kind of ride down with the jack as I lower the jack:
This is much easier if you have another set of hands. I usually don’t, so I just take her down slowly and watch for any problems. Keep in mind that if you are doing it alone, our trannys are light enough that if you see the tranny rocking in the wrong direction, you can easily reset it.
(bottoming out while on the jack)
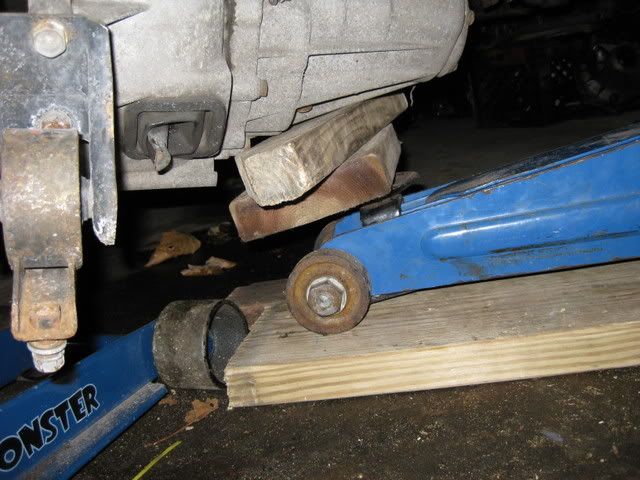
(top pic off the tranny while sitting on the jack)
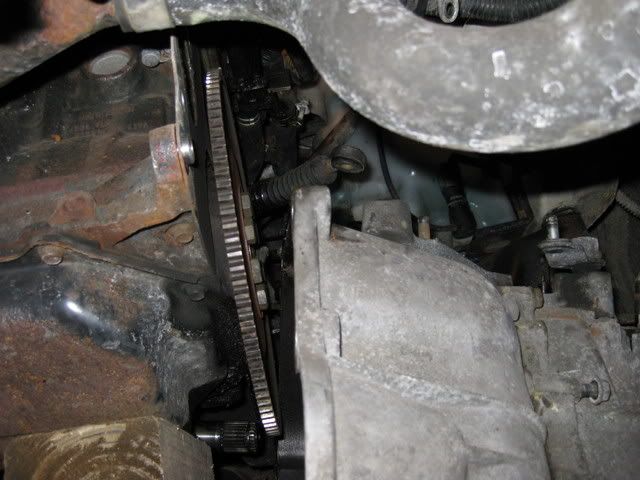
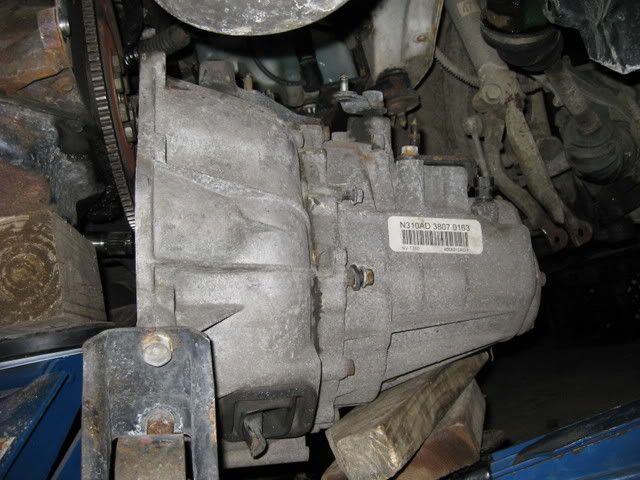
Then you can just work the tranny off of the jack and pull her out to see the greasy mess;
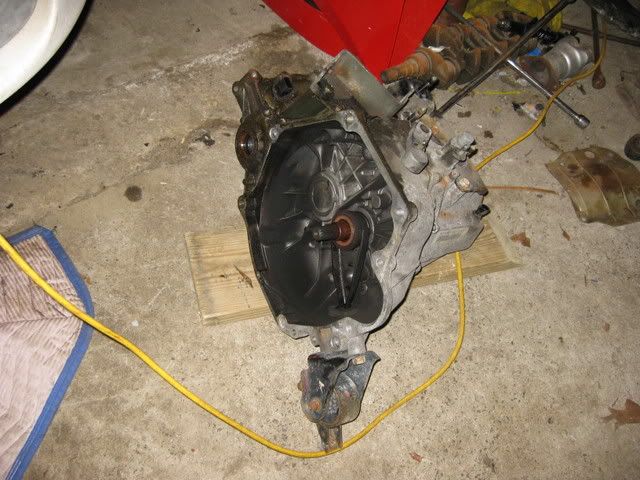
As you can see the clutch is not in the housing. It just sits inside the bellhousing during all of this. Then when the tranny is on the ground, you simply pull the clutch assembly out.
I wish I could have done a write up on the install. Just didn’t have the time. I needed to get this turned around and I didn’t have the time to take pics and write notes.
Again, there are many ways to pull the tranny, this is just one of the ways that it can be done.
written by bullettdsm
Powertrain_Maintenance
|
|
Document statistics:
Last modified on 2009-02-13 15:35:14
by bullettdsm
|
|

