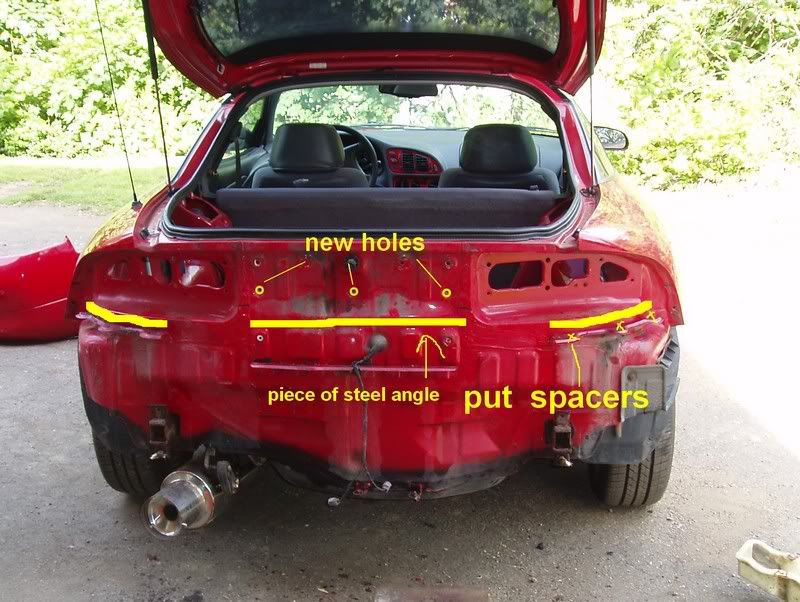
Talon to Eclipse Rear ConversionBy P.J. Lebied. Background: The changeover is SIMPLE. It's been over a year and I'm trying to remember all the things I had to do. this should be about 99% accurate. Here's what you need: Parts: - Mitsubishi 1999 bumper - $180 - Paint - $80 - L shaped brackets - $8 - Wire - $2 - Taillights -$200 - Eclipse reverse lights - $30 (junkyard) Installation: I did not dry fit the new bumper first, I had it painted and assumed it would fit, it works with the OEM Mitsubishi bumper, however I would not recommend this with an aftermarket bumper. -First you wanna take the old assembly off (taillights and bumper). You should probably use Cyan's directions on removing the rear bumper from his website. Such a great guy, isn't he? It's pretty complicated. I would recommend labeling (with tape or whatever) which bulb is which as you take them out of the taillights (i.e., left blinker, outer brake light, etc.) this will save some confusion. -Next you wanna cut the talon's reverse light's wire and make it longer, about 3 feet longer. this is because the talon has built in reverse lights in the actual taillights, but eclipses have them in their bumper. make an extension so the wire is long enough to fit in the bumper slots. make sure you test it, to make sure it works. after you have done this, just tuck the wire away into the trunk compartment, you don't need this right yet. -Now you can put on your eclipse bumper. If it is a 99 (or any OEM year really) eclipse like mine, it'll fit perfect. no bending, reshaping, twisting, pushing required. For this step you will need a friend to hold the bumper in the correct place while you make markings on the bare metal where to attach the L-shaped brackets to the upper lip of the bumper (directly beneath the taillights). You may not understand why these are necessary, but when you have the bumper off, you will see that the Talon bumper is lower due to the Talon's wider taillights. The stock mounting brackets are too low. Use about 4 brackets on the upper side and it will hold tightly. Once you have the upper brackets screwed in, you can connect the rest of the bumper, but remember to run the reverse light wires to the correct spot BEFORE you connect everything. if I'm not mistaking, there is a hole in the sheetmetal specifically for the reverse light wire. if not, MAKE ONE. -Now, you have to drill holes for the screws of the center piece of the new taillight. if you hold the center piece up to the metal where it goes, you will see that at the factory they have already made a specific location for these holes to be drilled. They just never drilled them. Go ahead and drill the holes, i think there is 6 or 8. connect the center piece. once this is done, you can go ahead and put the outer taillights on. plug in the bulbs, they will fit nicely. (thank God the eclipse light sockets are the same as the Talon's)  -This is the fun part. Simply sit in the driver's seat, start the car and floss your new setup on the streets of your town! Comments: Total - $500. Not too bad, right? It's a BIG difference in appearance. ____________________ Cars Modifications Image Exterior Body_Kits Body_Conversions Talon to Eclipse Rear |
| Document statistics: Last modified on 2007-05-18 18:14:27 by cs82685 |
